It’s easy to create course content in Thinkific without the tech headaches — get your online course up and running already!
Heads up, I'm an affiliate for Thinkific because I use and love them. I may get a commission if you decide to join their platform.
I just finished creating my first online course with Thinkific.
I chose Thinkific because it was free to get started and easy to add course content.
I know a lot of us are struggling to finish creating our courses, so in this blog post, I want to show you how easy it is to create course content with Thinkific.
So you can stop thinking about your course, and finally just finish it.
(Finishing it feels real good.)
TABLE OF CONTENTS
Adding Thinkific Video Lessons
Adding Thinkific Quizzes
Adding Thinkific Multimedia Lessons
Adding a Google Doc to Thinkific
Adding Engaging Learning Activities to Thinkific
Adding Google Forms to Thinkific
Adding Student Assignments to Thinkific
[VIDEO]: Adding Different Thinkific Lesson Types
Adding Text Lessons in Thinkific
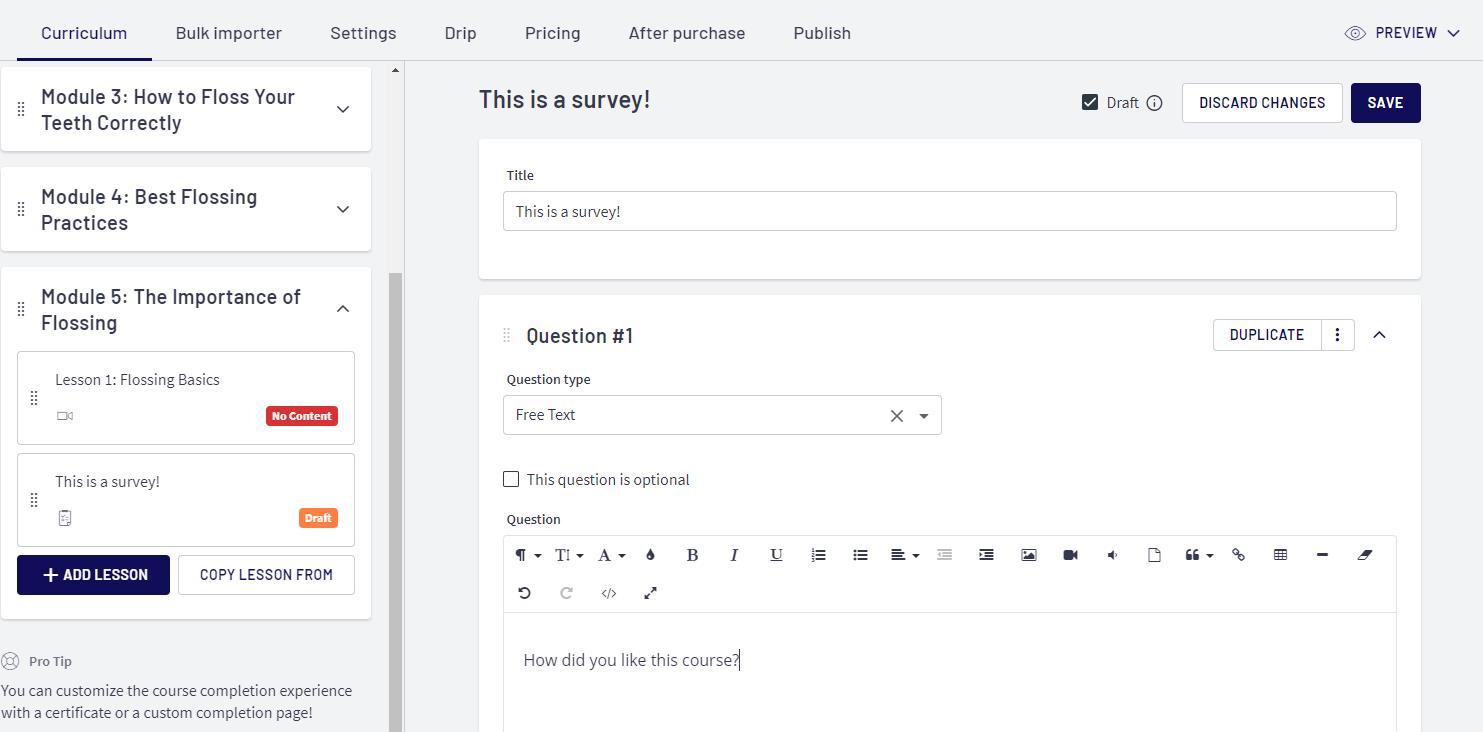
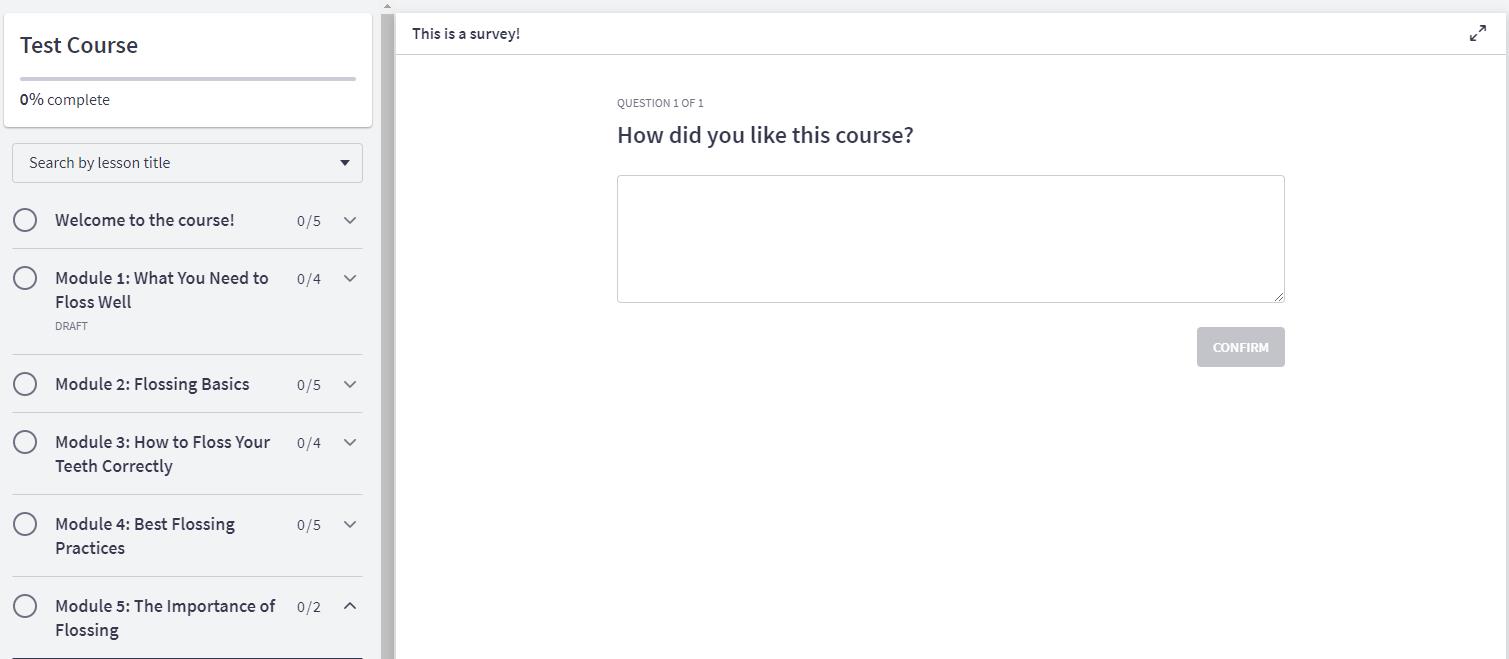
Adding Surveys in Thinkific
How to Create Course Content Easily With Thinkific
Courses are a grind, so you need a platform partner that makes everything less of a hassle.
But you also want a platform that looks good and engages your students so they learn.
Here’s what I discovered with Thinkific:
- You can add engaging learning activities for your learners.
- Adding value to your course is easy (captions, downloads, transcripts).
- The learning curve to create a course is extremely low.
Since this was my first course, I wanted to get version one out the door, and worry about everything else later.
So I created a course with slides and audio, which is the simplest way to get your course done.
I knew I wanted video lessons, engagement activities, text lessons, downloadable resources, and for students to submit assignments.
Like most online course platforms, Thinkific offered these lesson types (along with a bunch more).
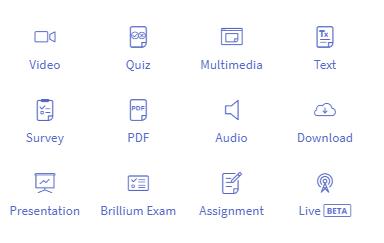
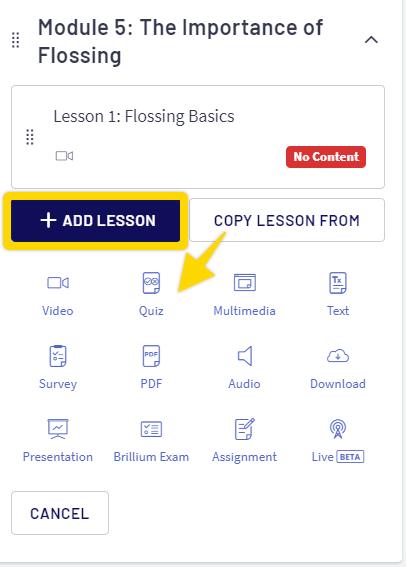
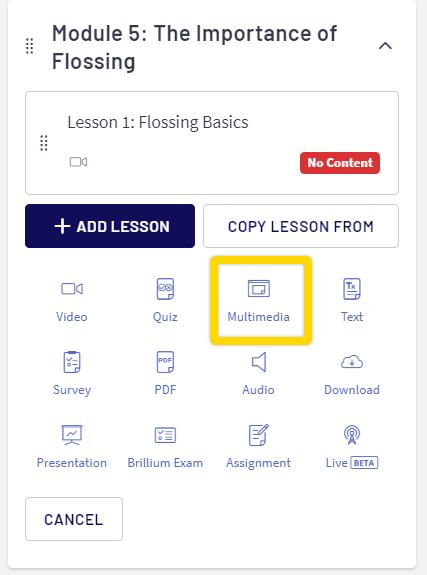
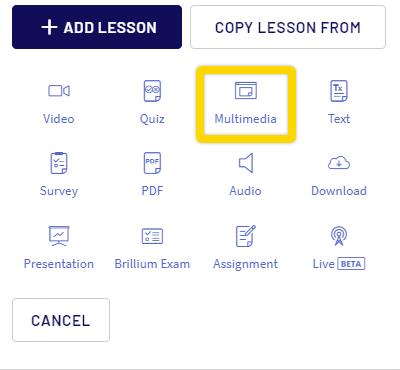
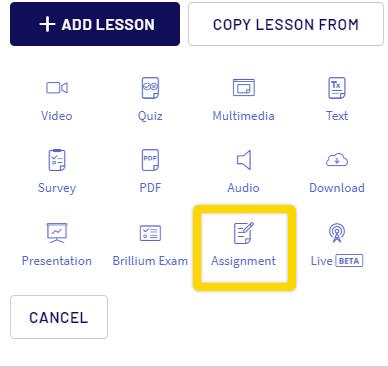
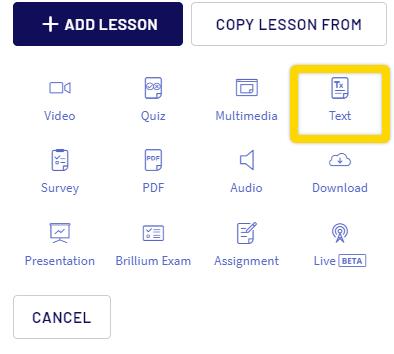
Here’s a screenshot of the types of course content you can add in their platform:
In my course, I used videos, quizzes, multimedia, text, and surveys from that menu above.
These are the most basic elements you can add to any course, so let’s break down each one below.
Adding Thinkific Video Lessons
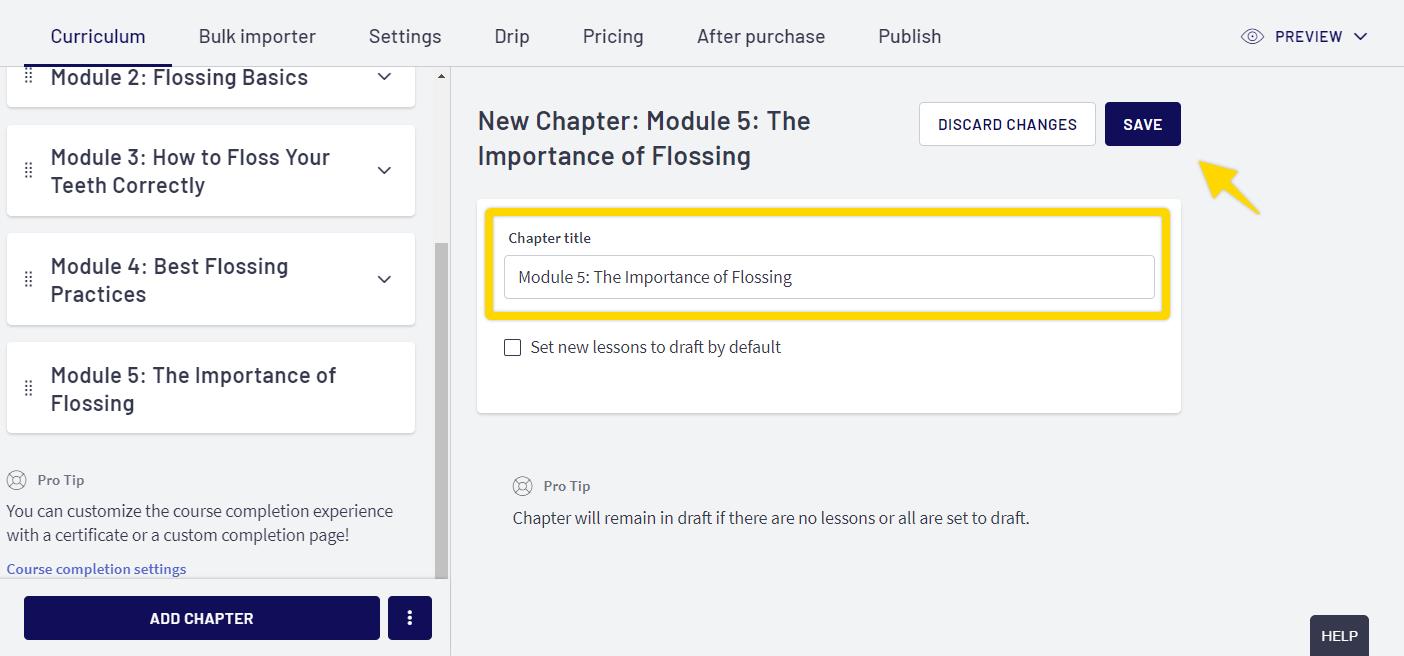
To add a video lesson in Thinkific, first, make sure you’ve created a Module by clicking ADD CHAPTER.
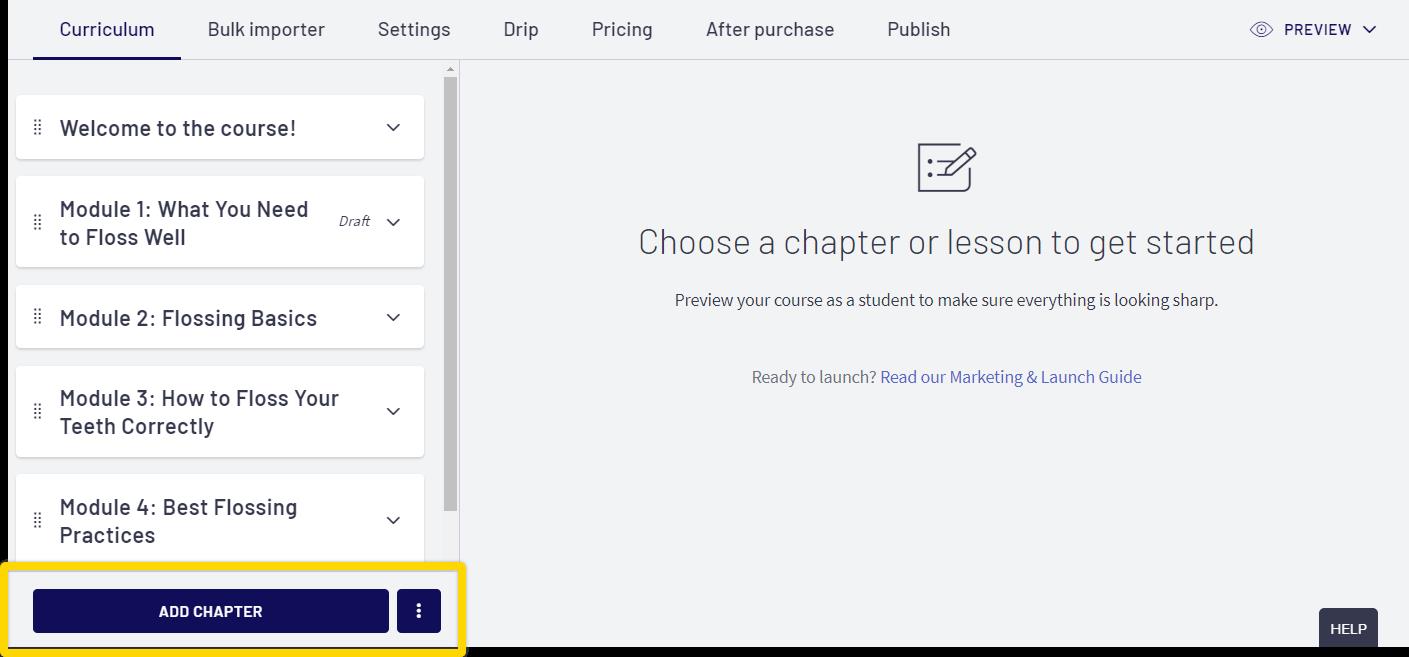 Title your Module and click Save.
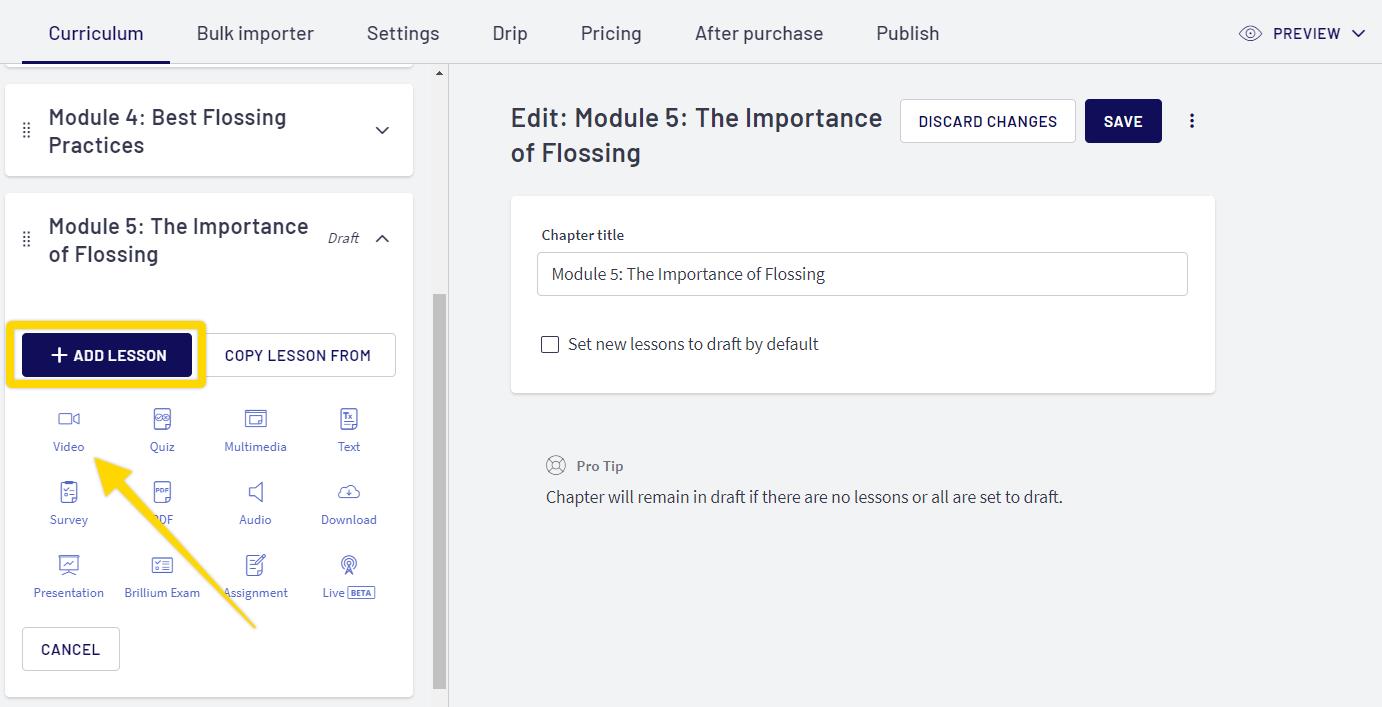
Once you’ve done that, click +ADD LESSON and choose Video as the lesson type from the menu that follows.
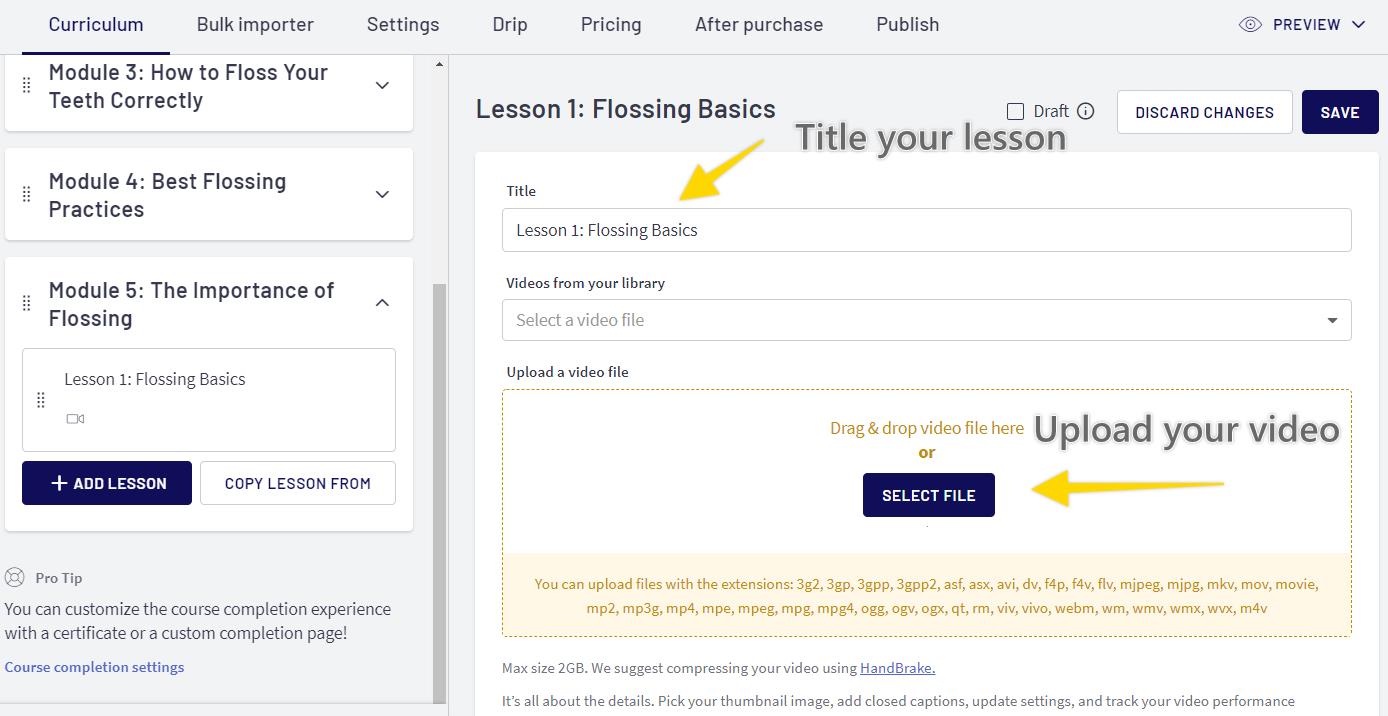
From there, title your lesson, and upload your video.
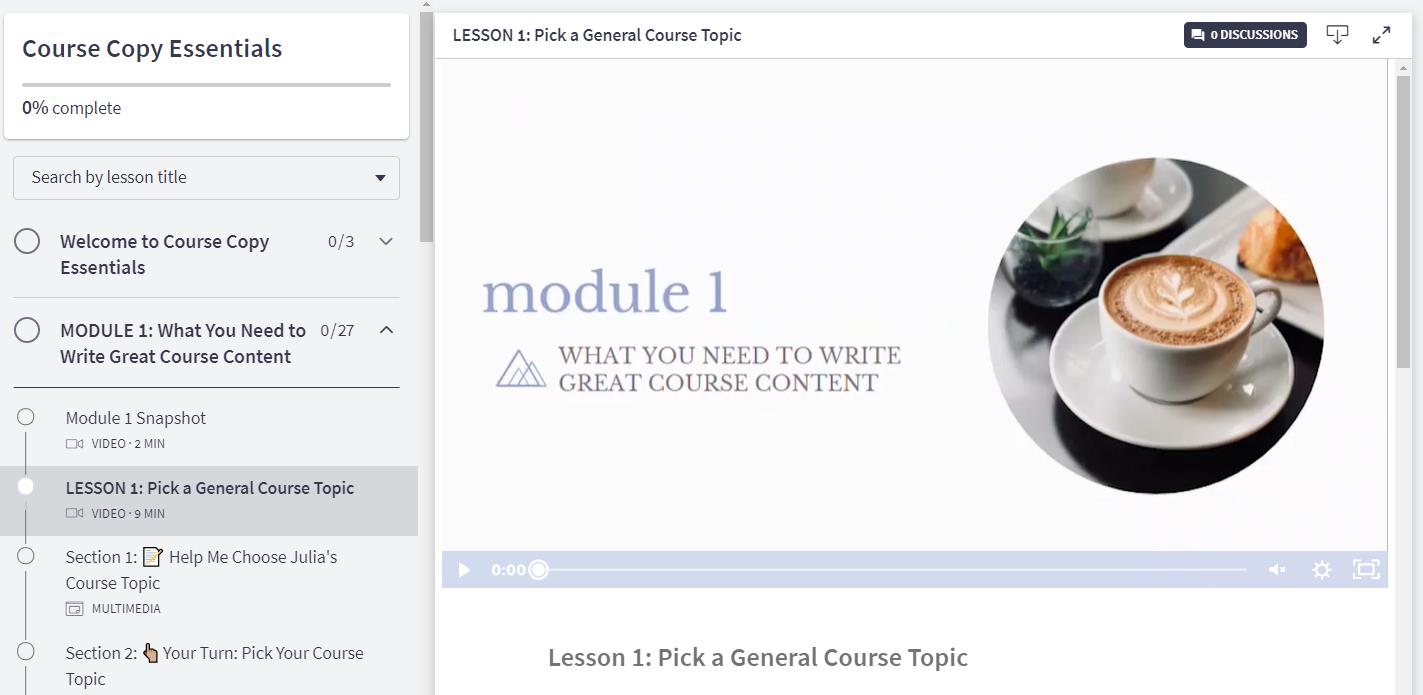
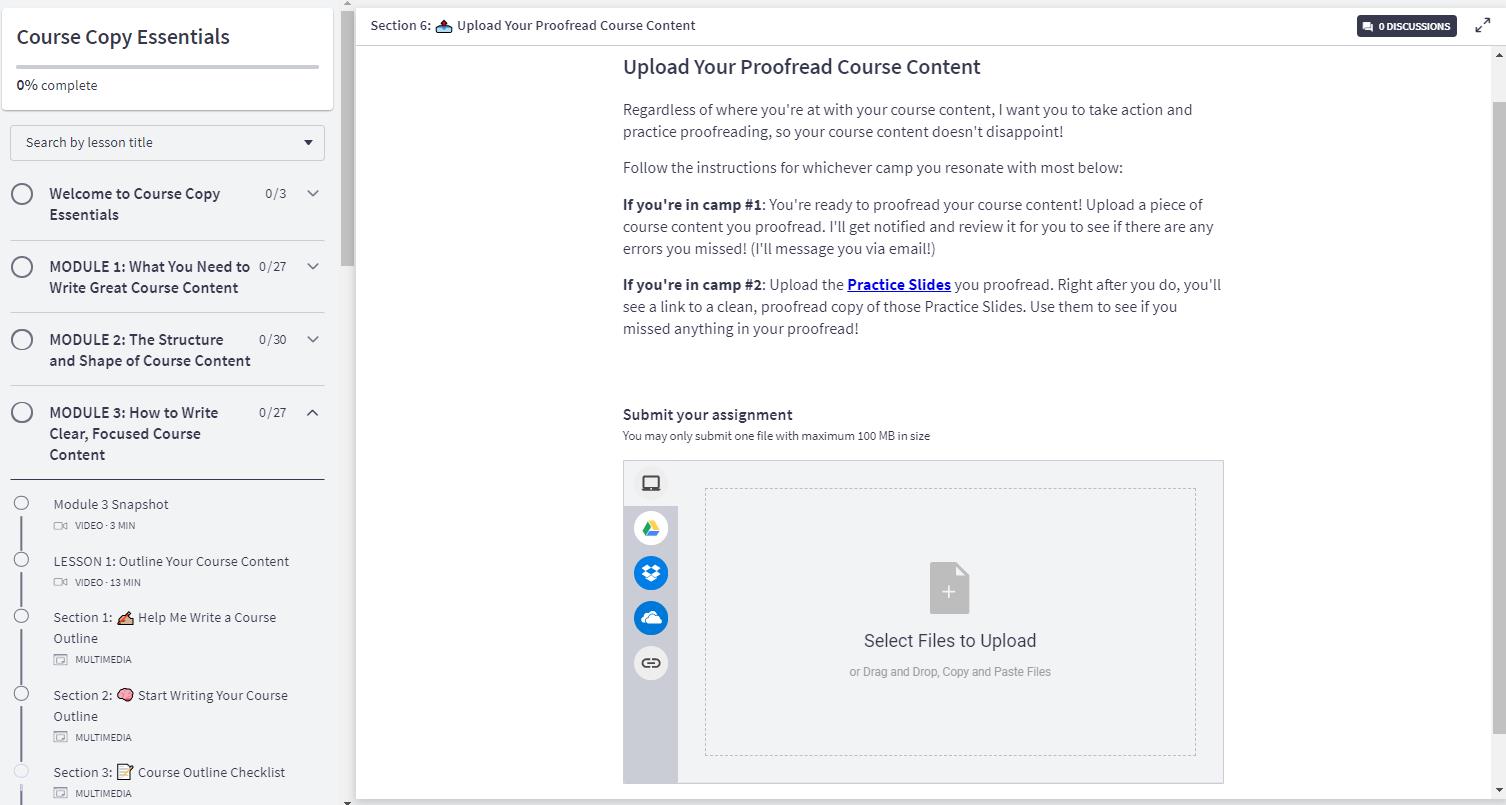
You can also preview what your lesson will look like for students after you upload it. Here’s what my video lessons looked like after upload, from a student’s perspective:
No matter what kind of video lesson you want to add to Thinkific, you can do it easily.
Adding Thinkific Quizzes
To add a quiz in Thinkific, choose Quiz from the lesson type menu after clicking +ADD LESSON.
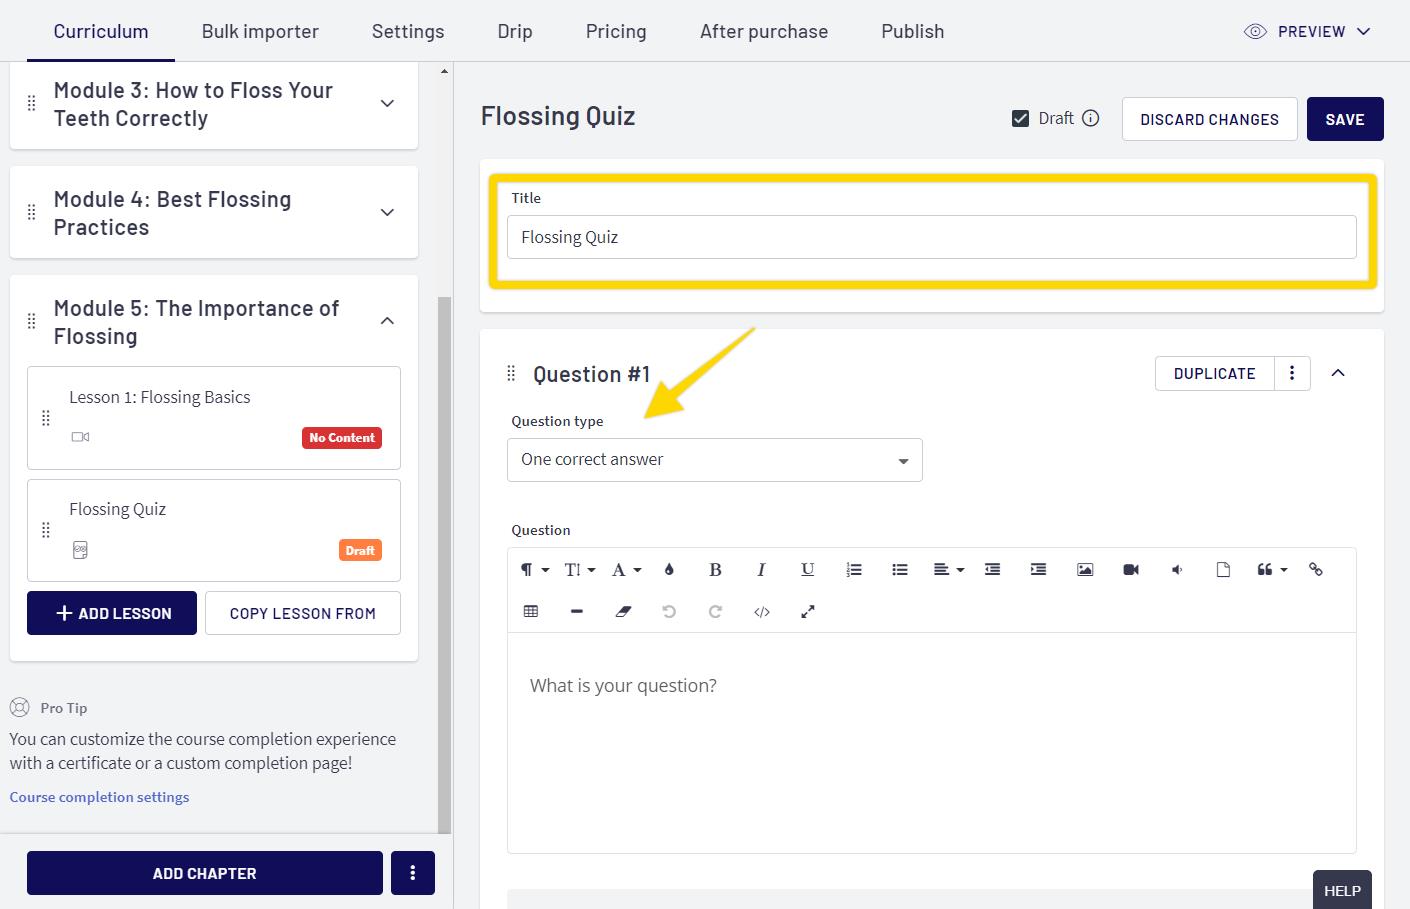
Once you do, give your quiz a name and select your question type for each question. You can choose to have one correct answer or multiple.
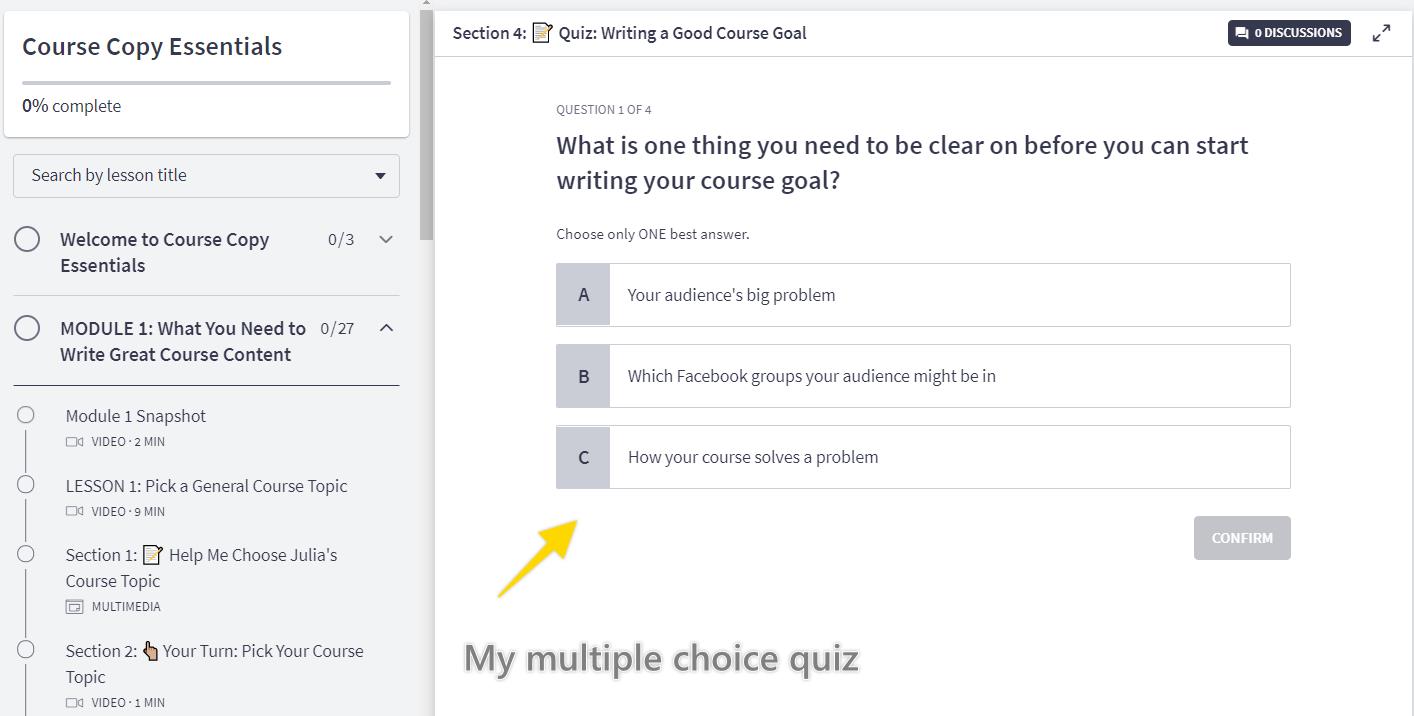
This is what the multiple-choice quiz looked like in my Thinkific course:
They’re super easy to create. You can view your students’ scores to see how they’re doing, and give them explanations when they get answers wrong or right.
If quizzes are a struggle for you, learn how to create quizzes that don’t suck here.
Adding Thinkific Multimedia Lessons
The multimedia lesson type in Thinkific lets you embed outside content into your course. This can be surveys, content from platforms like Articulate Storyline and H5P, or Google Docs and Sheets.
I added 3 types of multimedia lessons to my course: Google Docs, Google Forms, and interactive H5P content. I’ll explain all three below.
Adding a Google Doc to Thinkific
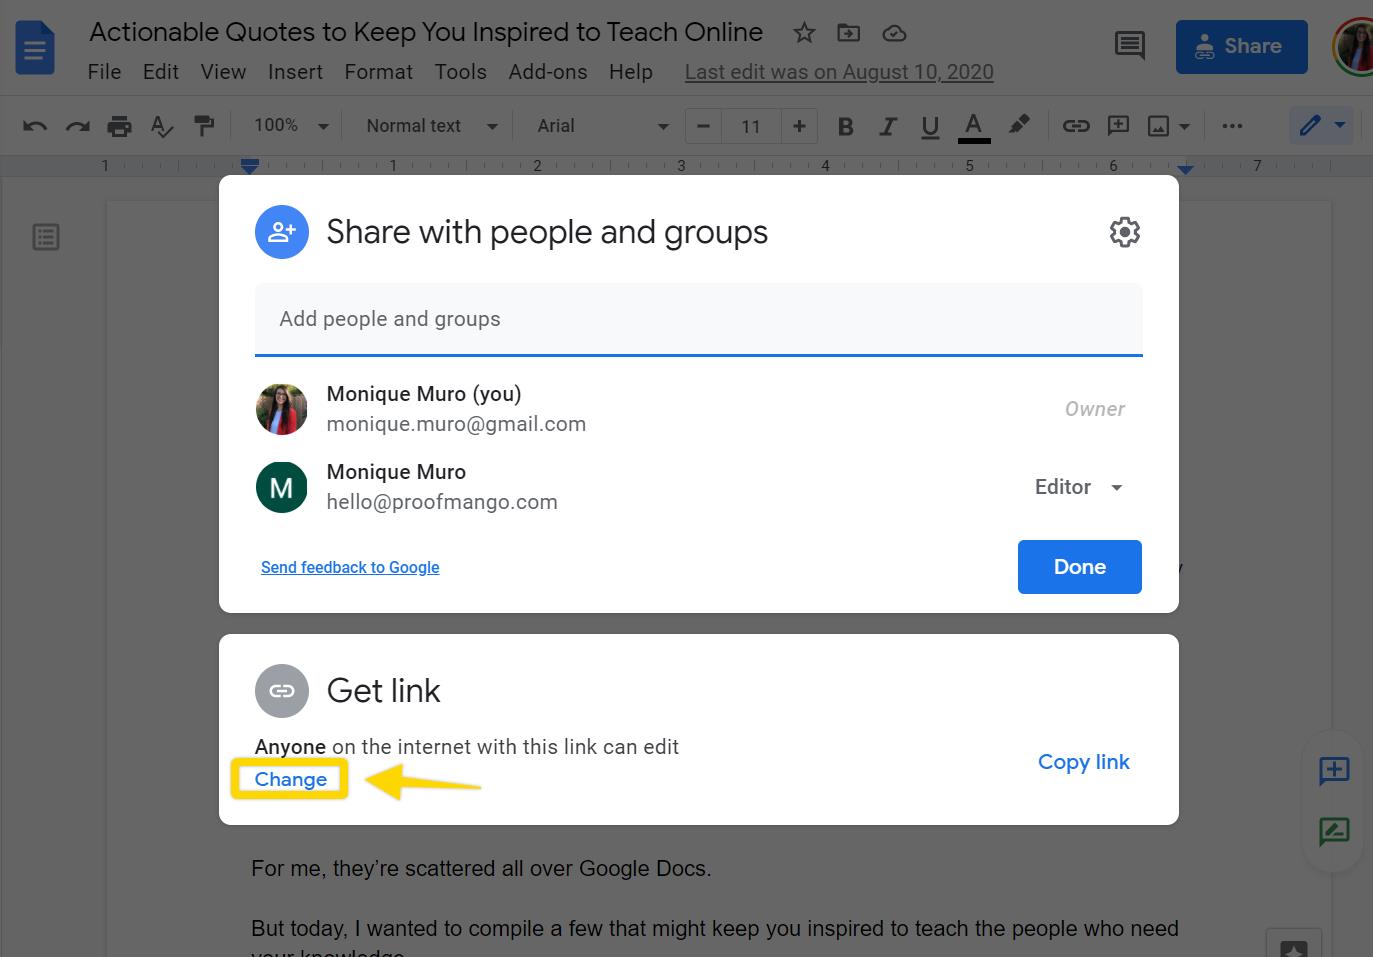
Add a Google Doc easily to Thinkific by first clicking Share in the upper right-hand corner of your document.
Then, click Change under Get Link.
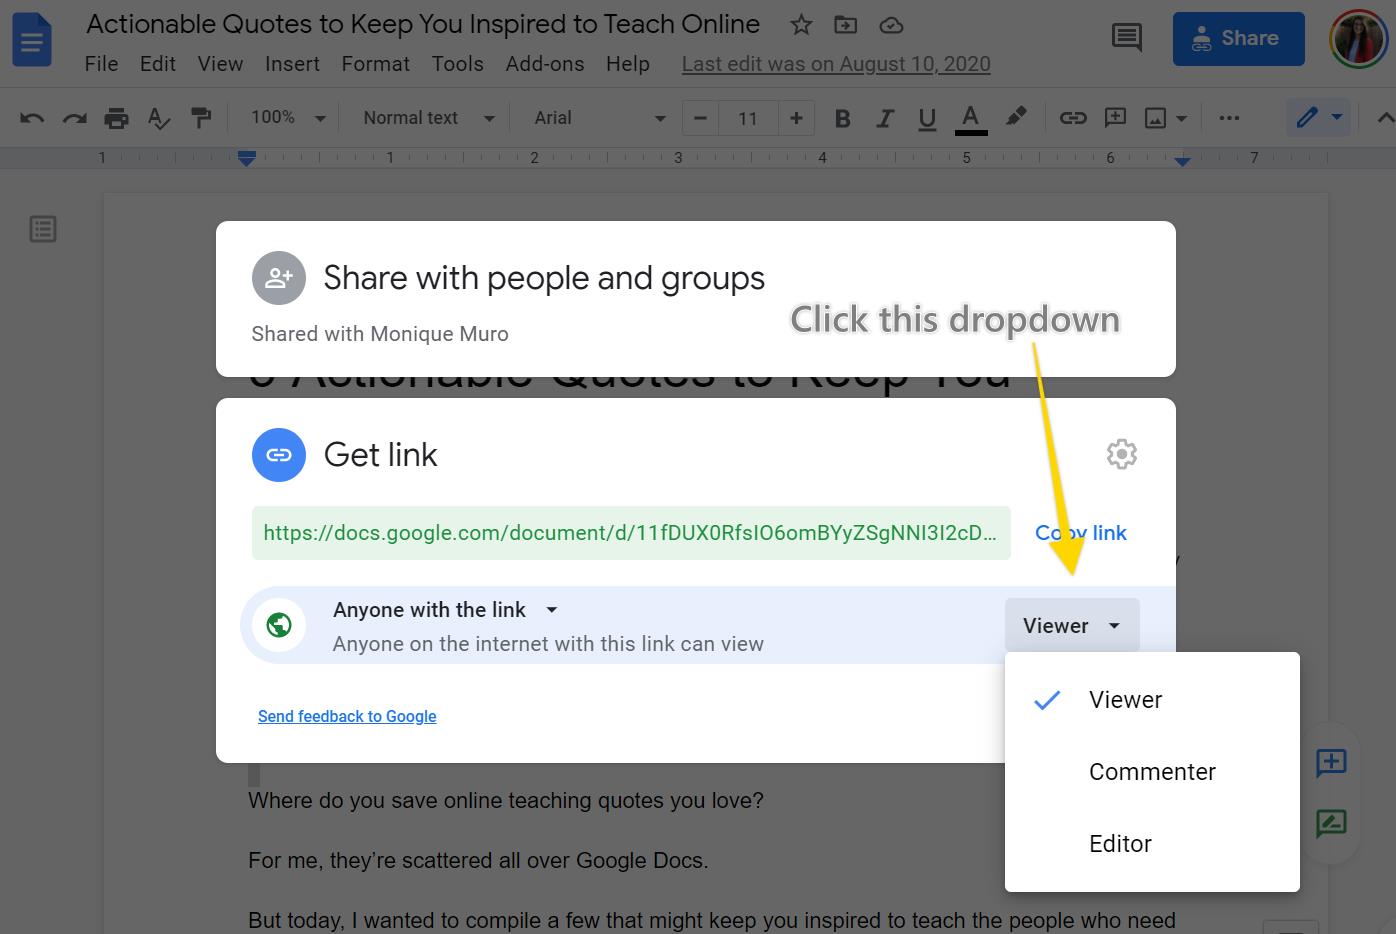
Click the dropdown menu to adjust the viewing permissions: Viewer means people can view it, Commenter means people can comment, and Editor means people can edit the document.
Choose the permission you'd like to give people with this document.
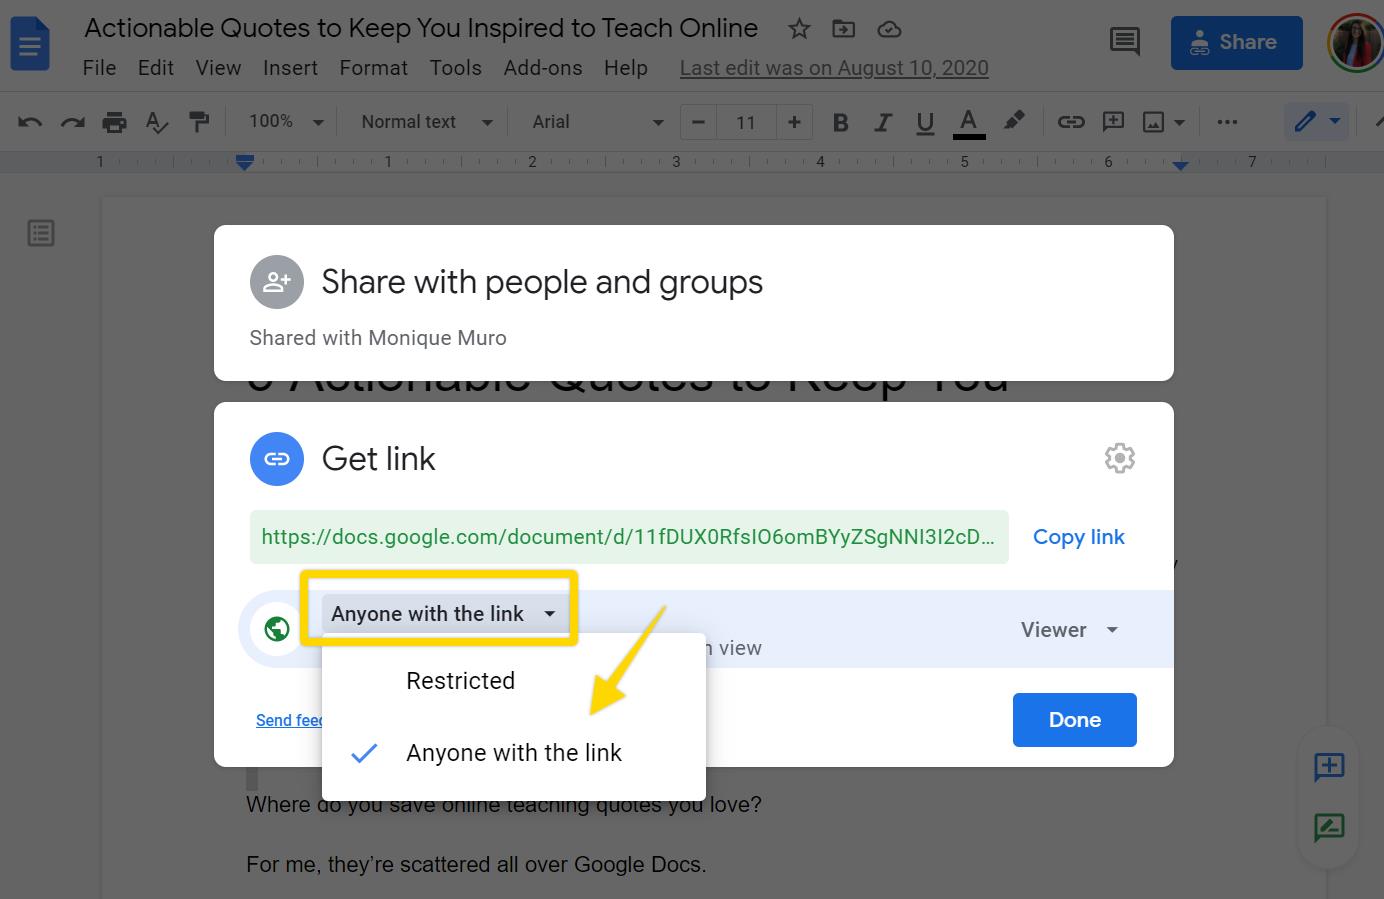
Next, click the Anyone with the link option from the dropdown menu.
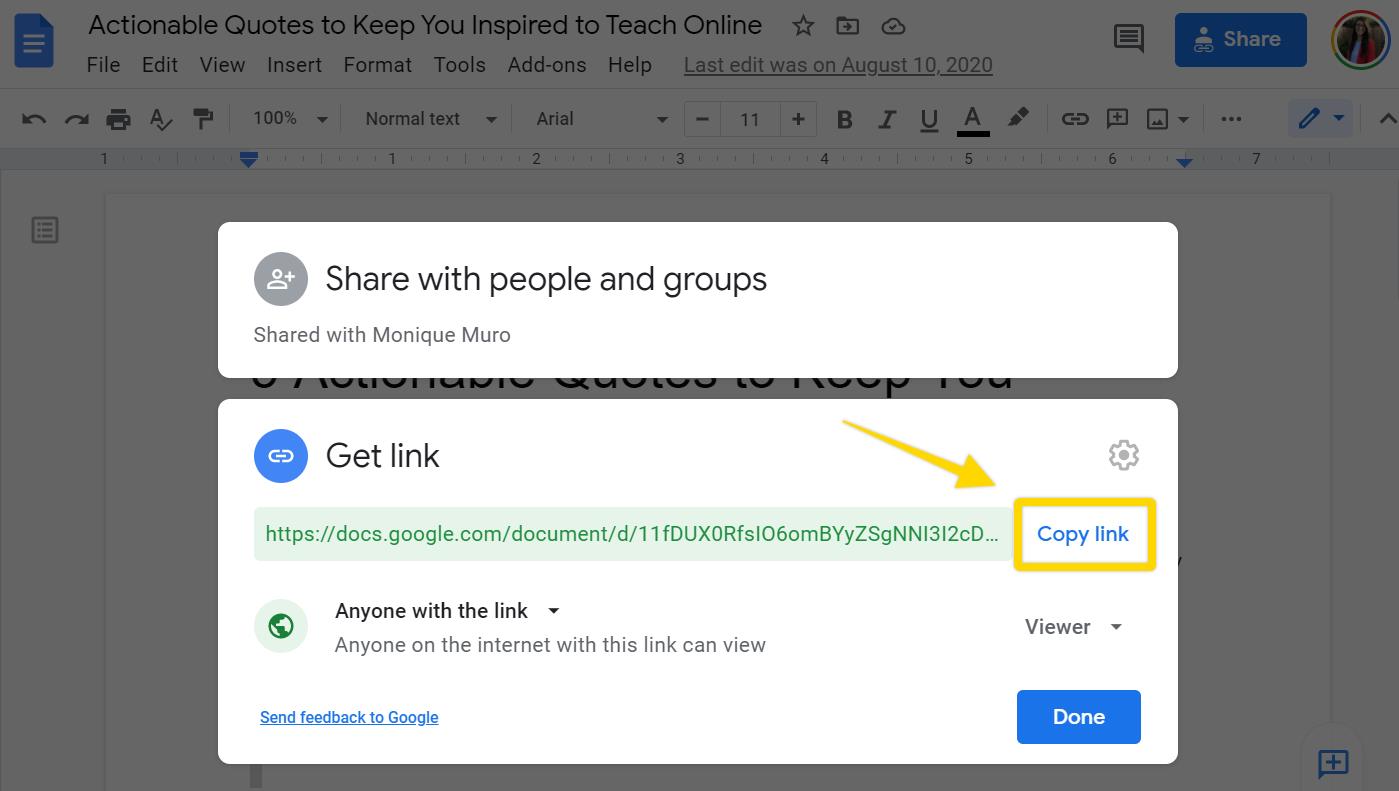
Once you do that, click Copy link.
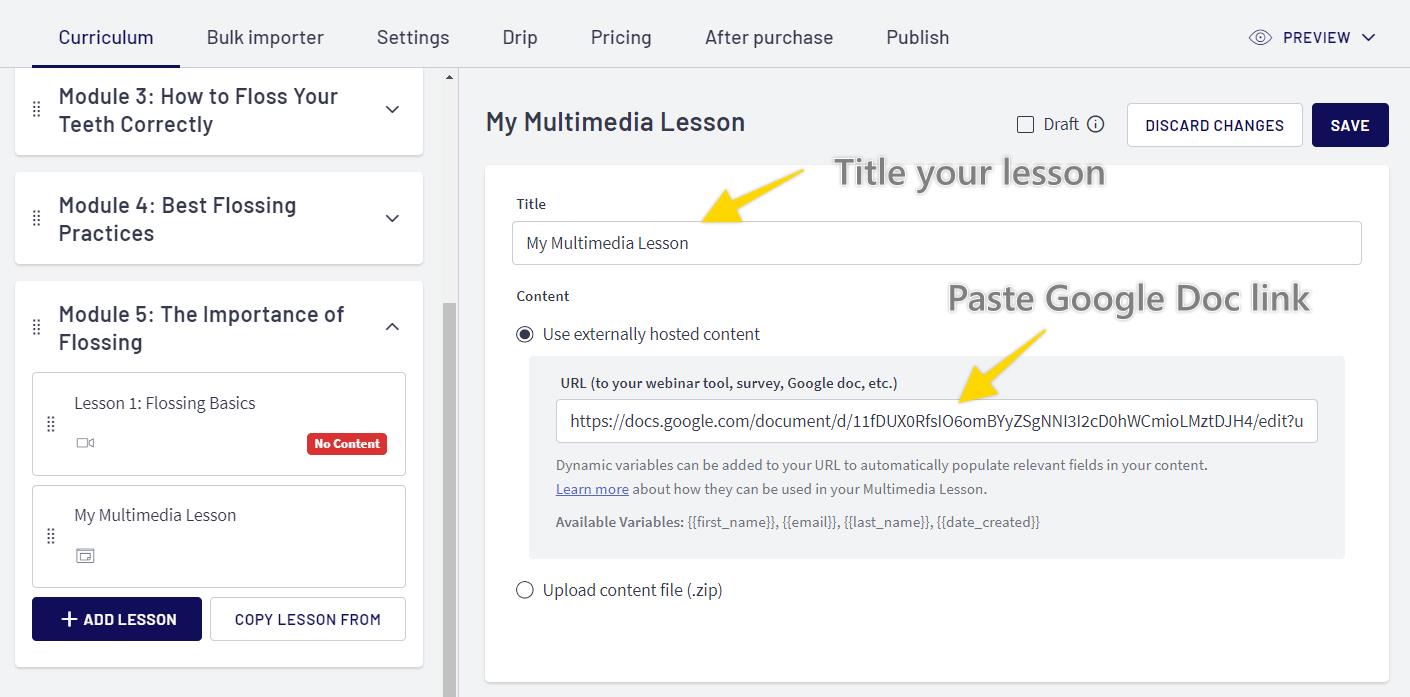
Next, head over to Thinkific. Inside of the lesson menu, click Multimedia.
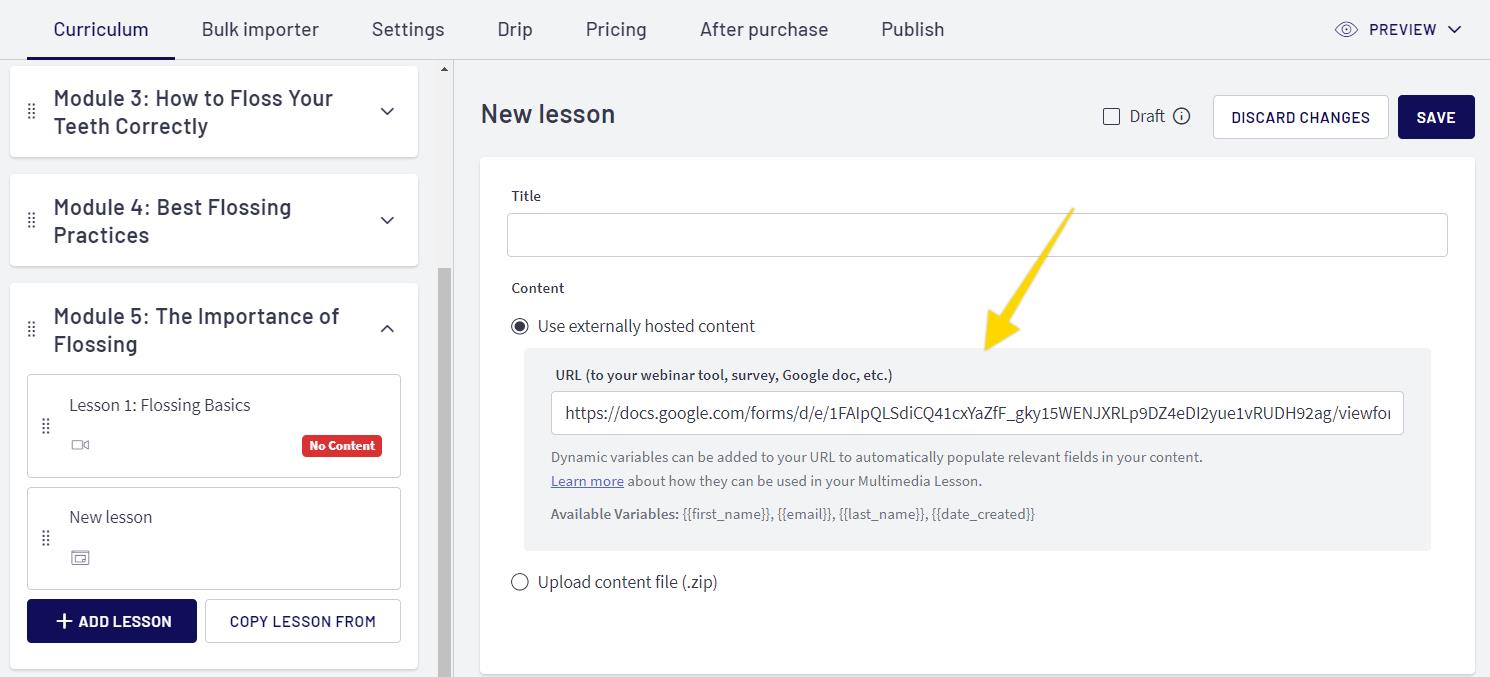
Next, title your lesson, and paste the link from Google Docs into the Use externally hosted content section.
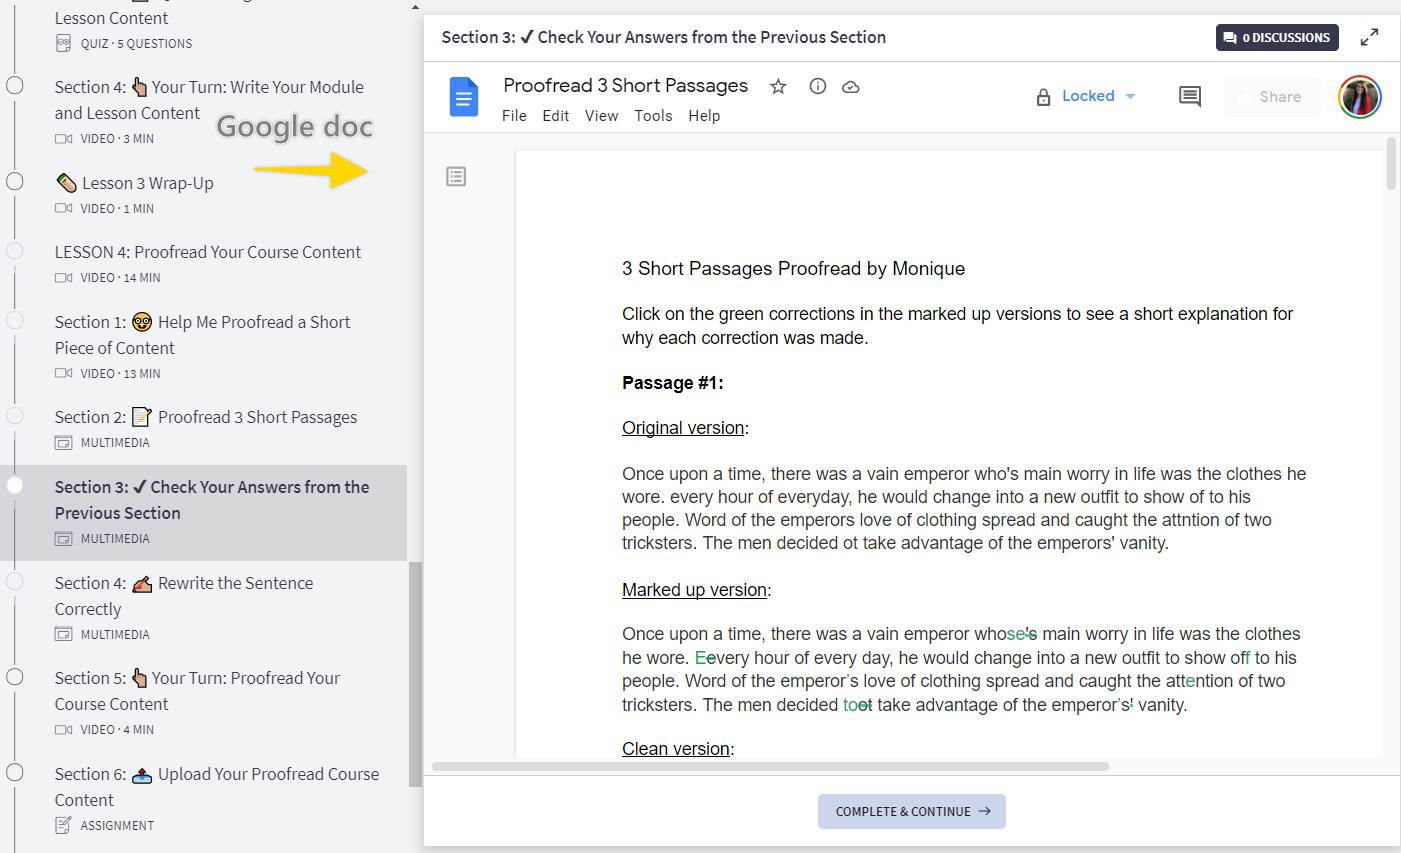
This is an example of a Google Doc I added to my course:
One of my lessons teaches you how to proofread your course content, and the homework was to proofread a piece of content.
So I added a Google Doc with answers to that proofreading assignment, so students could check their work. I loved it — no brain fog required.
Adding Engaging Learning Activities to Thinkific
The other type of multimedia lesson I added to my course with Thinkific was interactive content from H5P.
H5P is a platform that allows you to create engaging learning activities within your course.
Think: interactive videos, drag-and-drop activities, interactive presentations, flash cards, and memory games.
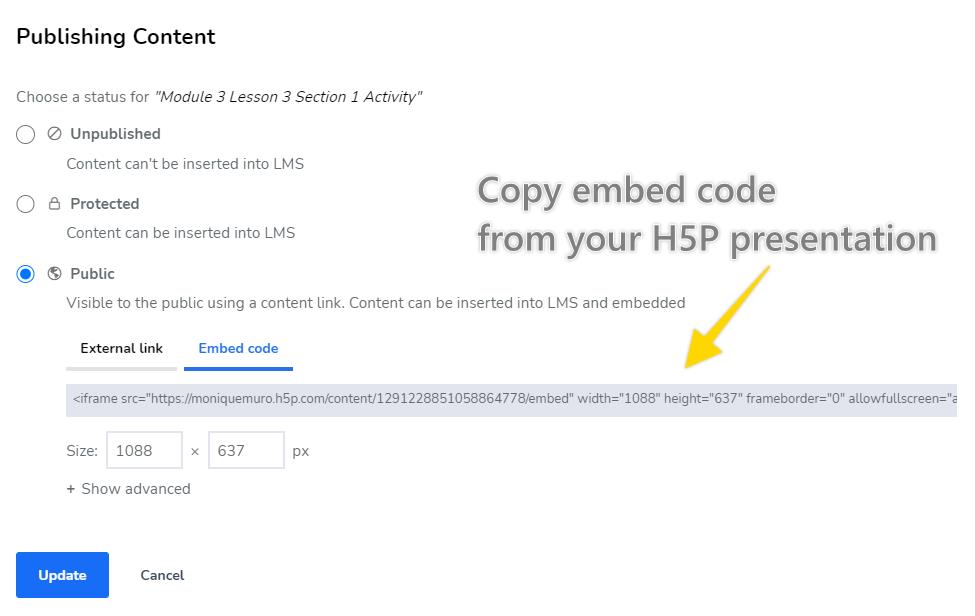
Once I created a presentation in H5P, I grabbed the embed code:
From there, I added a new multimedia lesson in Thinkific:
Then, I copy only the URL portion of the H5P embed code.
From there, I paste the URL portion into the Use externally hosted content section of my multimedia lesson.
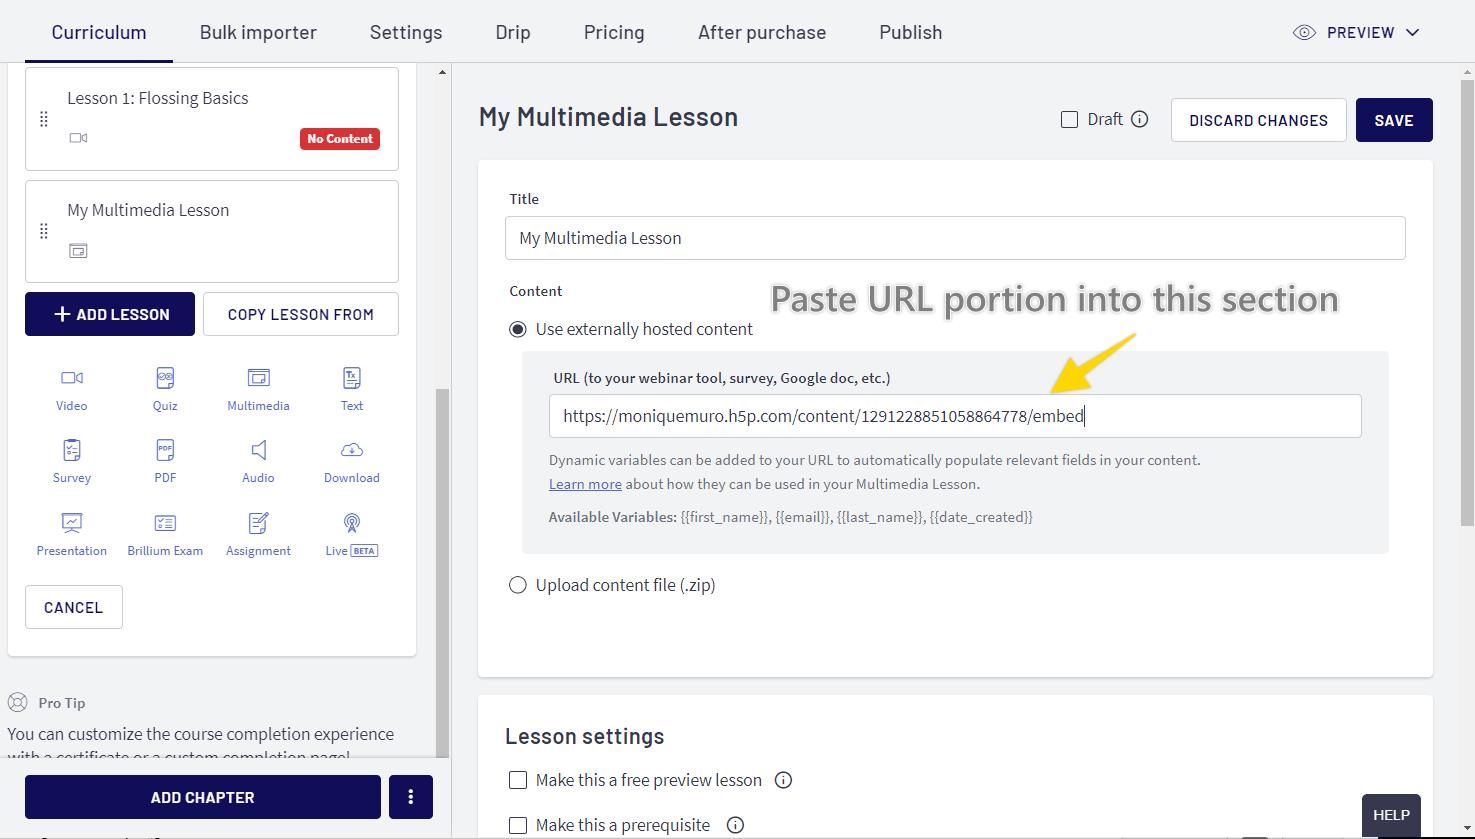
It’s important to remember that Thinkific multimedia lessons don't support iframes. So you’ll need to pull out the URL from your embed code before you add it to your multimedia lesson.
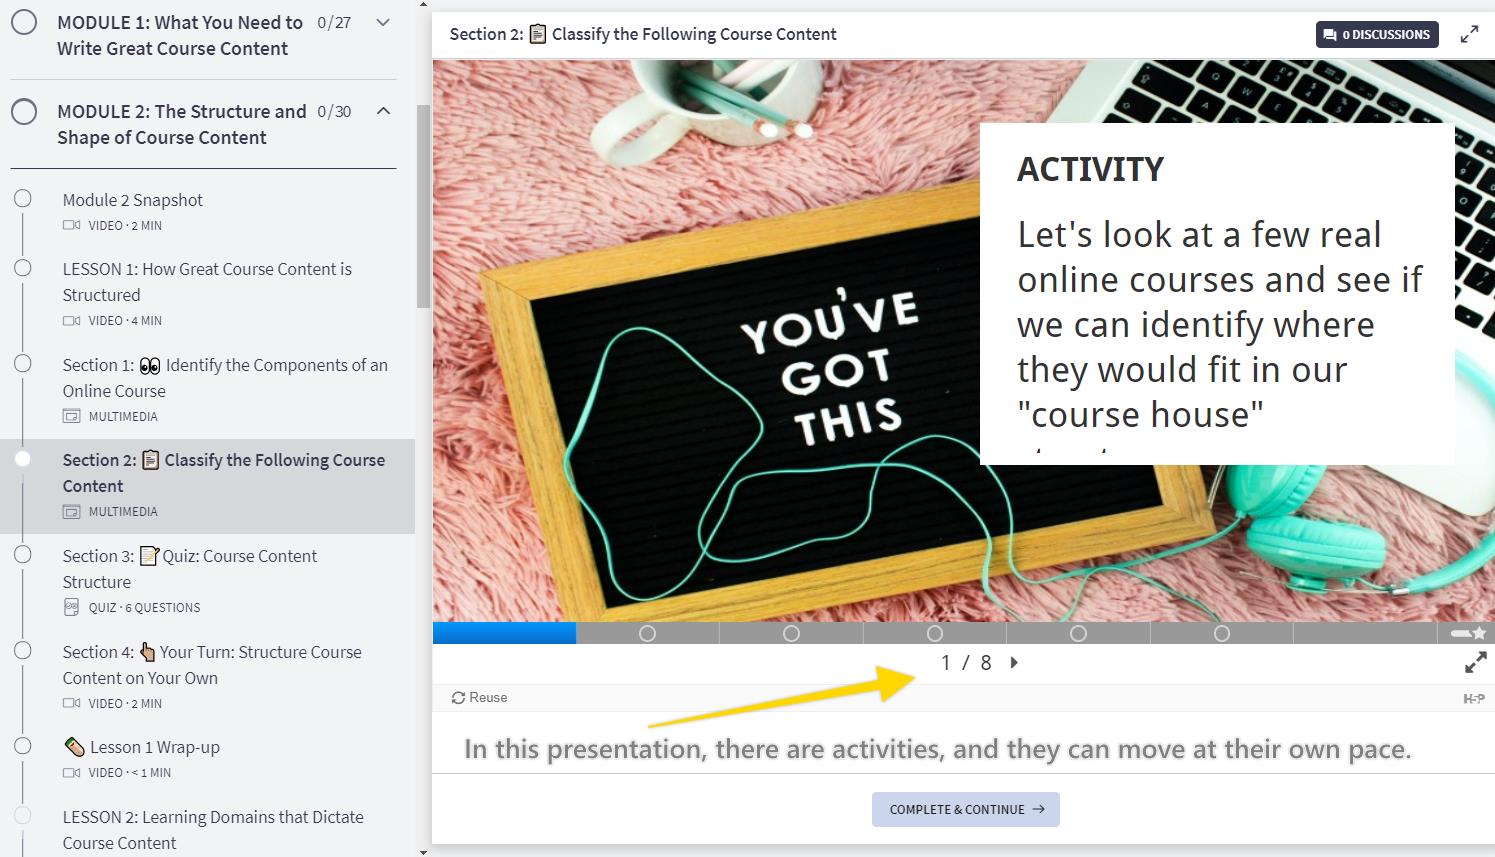
Here’s a quick look at what my multimedia lesson looks like when I test it in Thinkific.
So you can do this with any other platform you’re using to create engaging learning activities, if they have embed codes.
You can just grab the URL from the embed code, insert it into your Thinkific course as a multimedia lesson, and you’re ready to go!
Considering Thinkific? Get their $99/month pro plan free for one month.
Adding Google Forms to Thinkific
The final multimedia lesson type I’ll talk about is one where you add Google Forms to your Thinkific course.
Google Forms is a versatile add to your course — you can use it to add a feedback survey to your course, a checklist, or a short-answer questionnaire.
And you can add it to Thinkific just by adding the Share link from your Google Form.
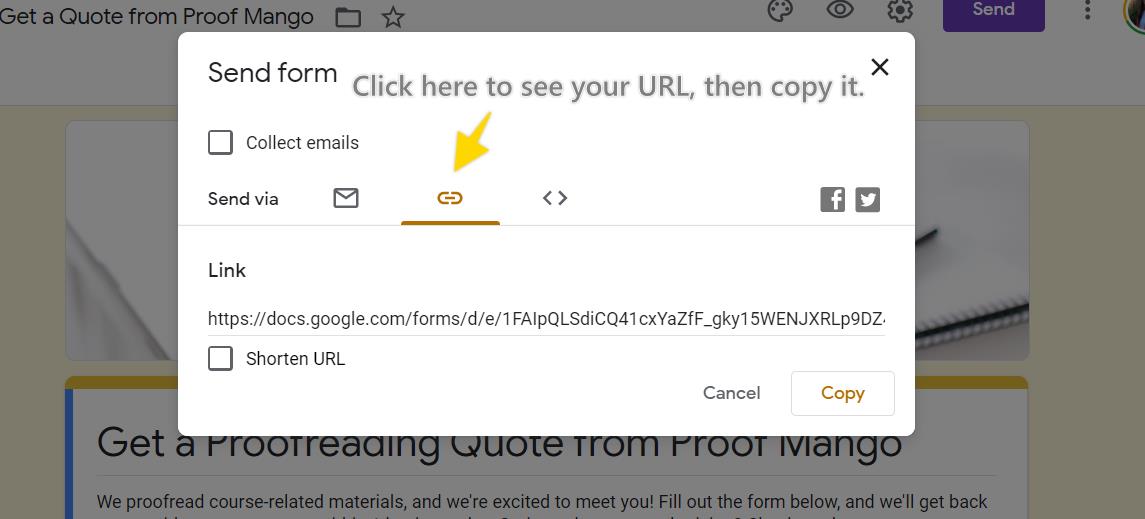
So if you've created a Google Form, you’ll click Send to grab your link.
Then copy it:
Then paste it into your multimedia lesson, the way we did with the others. So add a multimedia lesson:
Then paste it into the Use externally hosted content section of my multimedia lesson.
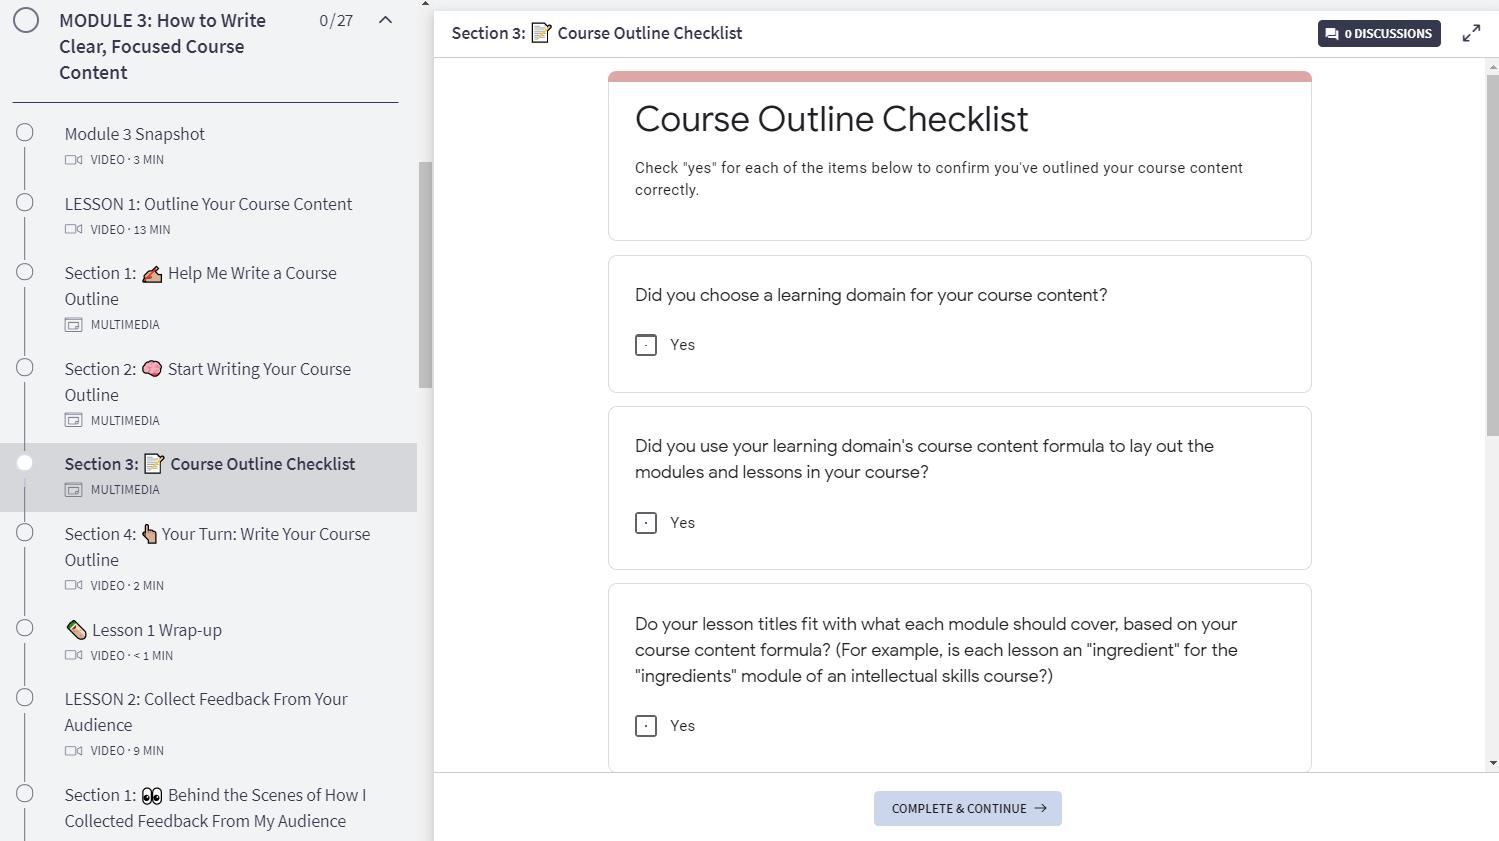
In my course, I added a checklist as an activity for students to complete and stay on track of their tasks. I did this in Google Forms inside of Thinkific, here's what it looked like:
When you do this, it lets your students interact with the checklist right inside the platform.
That means you don’t have to create a PDF that people have to download, it’s just all right inside the course.
Adding Student Assignments to Thinkific
If you want to give your students homework they have to complete and upload, just add the Assignment lesson type in Thinkific.
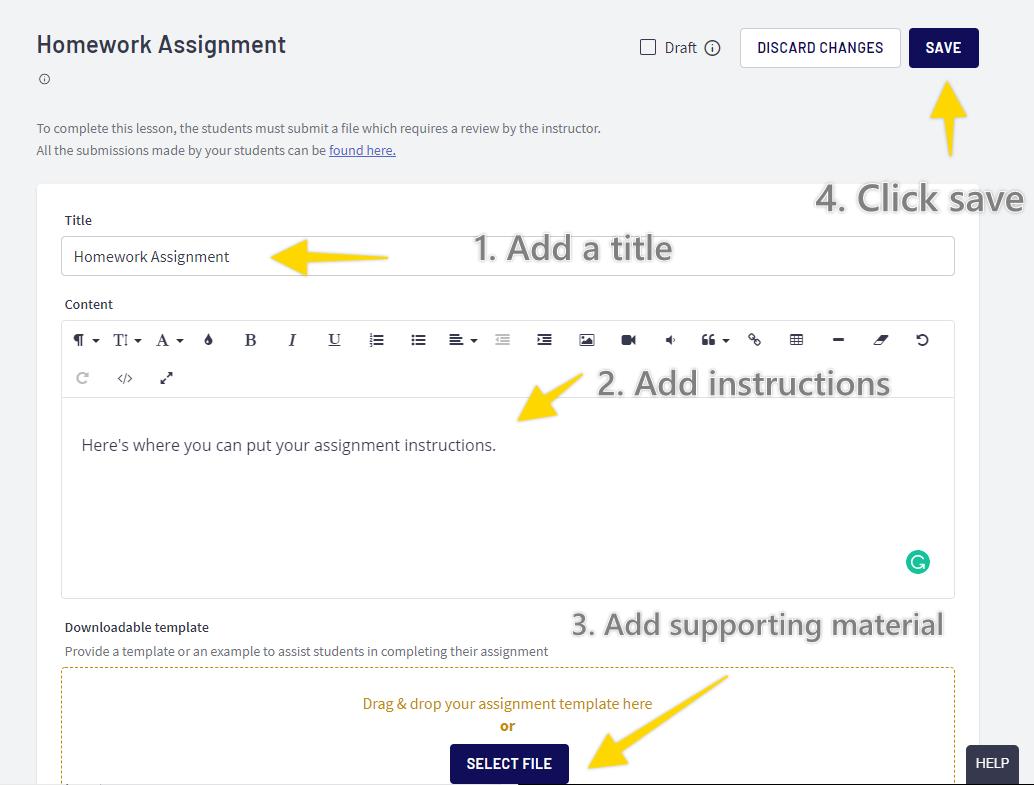
Once you do, just give it a title, add some instructions, upload any supporting documents they might need, and click Save.
Here’s how the student assignments looked when I previewed them in my Thinkific course:
Students can submit their assignments right inside the platform, and you’ll get an alert once they do.
You can also make this lesson type a prerequisite, so they can’t move on in the course until they’ve submitted their homework, and you’ve reviewed it.
Also, you’ll get alerted each time a new assignment is submitted — BOOM!
[VIDEO] Adding Different Thinkific Lesson Types
If you prefer video tutorials, below is a video I created on how to add the lesson types above in Thinkific.
You’ll see how to add:
- Video lessons
- Quizzes
- Multimedia (Google Docs/Forms)
- Assignments for students to submit
Adding Text Lessons in Thinkific
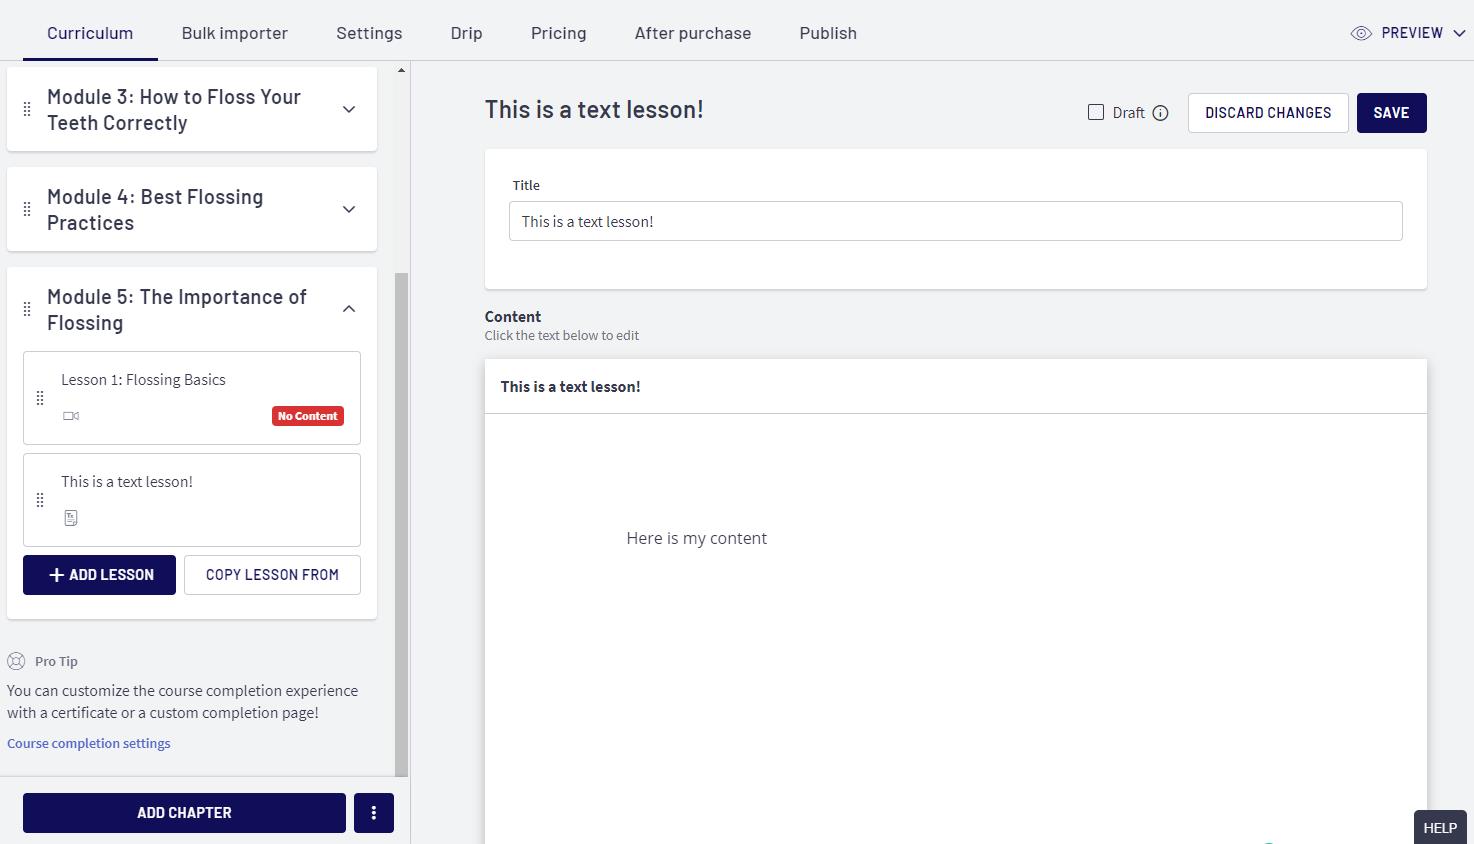
If you want to add a text lesson inside Thinkific, choose Text from the lesson type menu.
From there, you can type in any text you want your students to see, like a text lesson, instructions for a subsequent lesson, or directions for engaging with the course.
Here's an example of how it looks on the back end of Thinkific:
In my course, I added a text lesson with instructions on how to share the content they just created in that lesson.
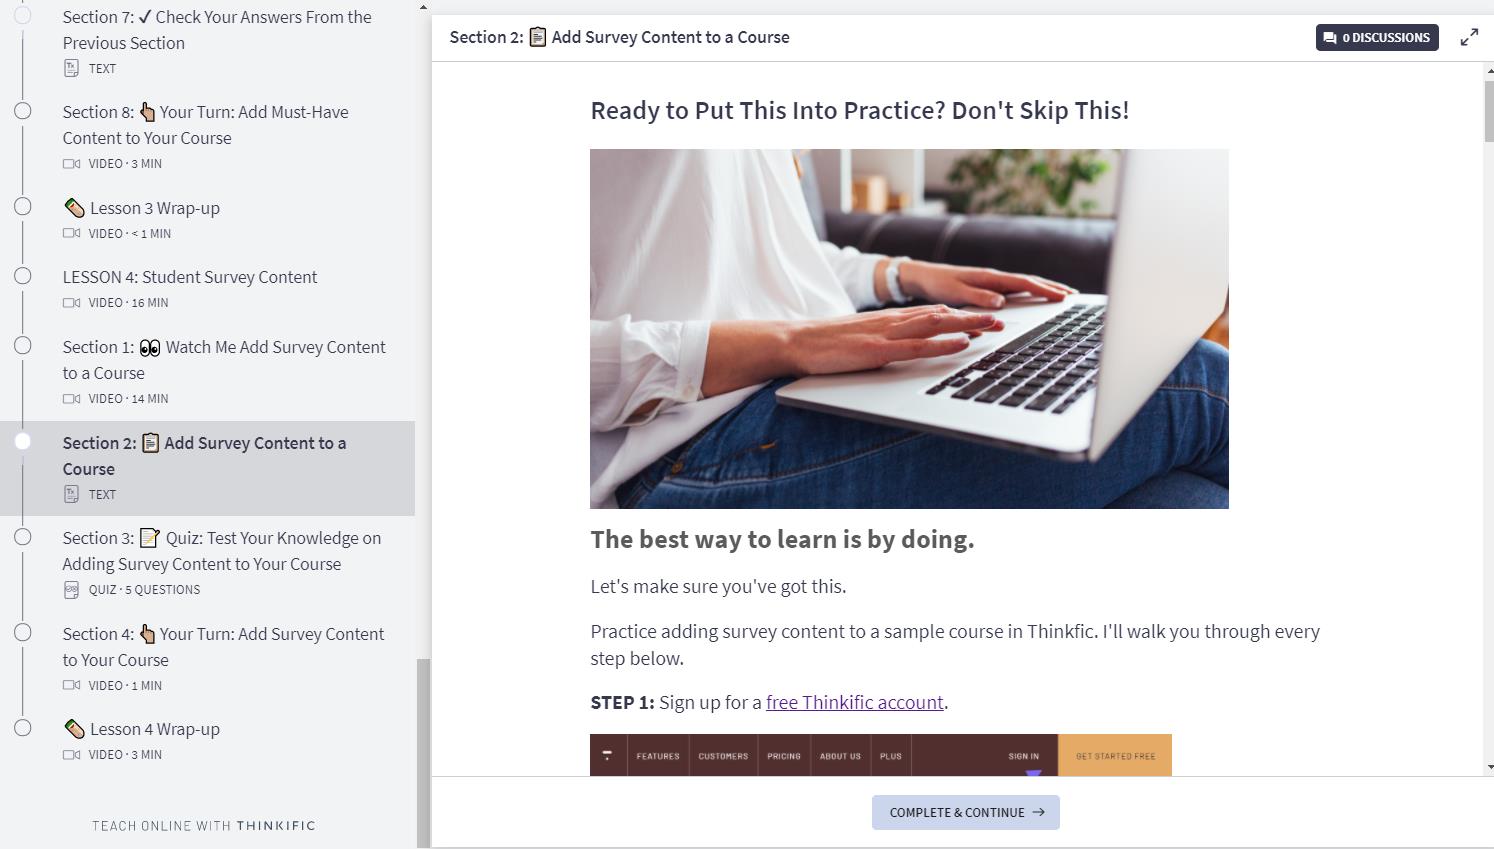 You can add any type of content you want in a text lesson within Thinkific. You can also format them with headings and subheadings, and add images so they’re more appealing.
Adding Surveys in Thinkific
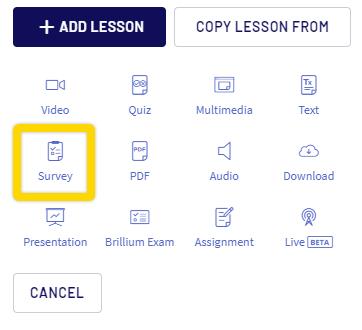
Thinkific makes it easy to add a survey anywhere in your online course. Just click Survey from the lesson type menu.
From there, you can easily create survey questions inside of your course.
I highly recommend adding a survey at the beginning and end of your course.
Here's how it would look:
A survey at the beginning of your course could ask questions like:
- What do you hope to be able to do by the end of this course?
- What level would you say you’re at with [subject matter]?
- What are your biggest roadblocks so far with [course topic]?
- How have you tried to solve [big problem] before?
A survey at the end of your course could ask questions like:
- What was your number one challenge with [course topic] before you took this course?
- What did you discover about this challenge in [course title]?
- What was the number one result you got from this course?
- What are 3 other benefits you got from this course?
- Is there anything you would have changed about this course, or improvements you would recommend?
In Closing, Online Courses Are a Grind
I spent hundreds of hours over the span of 4.5 months creating my course.
It takes focus. It takes patience. And it takes a ton of perseverance. (You can’t have shiny object syndrome halfway through — you’ll never get there!)
But the easiest part was creating my content with Thinkific. When the course platform doesn’t interfere with your progress, it’s a good sign.


